Introduction : Bathroom Leakage to Ceiling Below: Causes, Solutions and Prevention Tips (2026)
Water stains on the ceiling below a bathroom, damp patches, peeling paint and unexplained seepage are common problems in Indian homes. While a failed waterproofing membrane or concealed plumbing leak can be responsible, the problem can also begin with something much smaller: loose tile grout, cracked sealing around the floor drain or an opening where the bathroom floor meets the wall.
These defects may allow water to pass beneath the tiles. Over time, moisture can accumulate in the underlying screed or slab and eventually appear as dampness or leakage in the ceiling below.
For homeowners in Pune, understanding these common problem areas and inspecting them regularly can help identify defects early and reduce the risk of expensive repairs.
1. Loose or Deteriorating Tile Grout: A Common Cause of Water Seepage
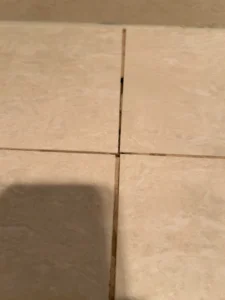
Bathroom tiles are installed with joints that are filled using grout. Over time, grout can crack, become loose, develop gaps or deteriorate because of movement, cleaning chemicals, poor installation or repeated water exposure.
When grout joints become defective, water can enter the layers beneath the tiles. This does not mean every damaged grout joint will cause a ceiling leak, but it can increase moisture penetration, particularly where the underlying waterproofing is damaged or absent.
Signs that your bathroom grout needs attention
-
Grout is missing or falling out of tile joints.
-
Fine cracks appear between adjacent tiles.
-
Tile joints remain discoloured or damp.
-
Tiles sound hollow or have started loosening.
-
Dampness appears on the ceiling below after the bathroom is used.
How to prevent grout-related leakage
Inspect bathroom tile joints periodically, particularly around the shower, wash area, floor drain and frequently wet sections.
If grout is cracked or missing, remove the loose material carefully and refill the joint with a suitable grout. Epoxy grout may be appropriate for many tile joints because of its low water absorption and chemical resistance when correctly installed.
Cement-based grout may also be suitable for certain applications, but it is more porous and may require appropriate sealing and maintenance.
Important: Grout is not a replacement for the waterproofing layer beneath the tiles. If water continues to seep through after the joints have been repaired, investigate the underlying waterproofing and plumbing rather than repeatedly applying new grout.
2. Nahani Trap Leakage: Why Water Can Seep Beneath Bathroom Tiles
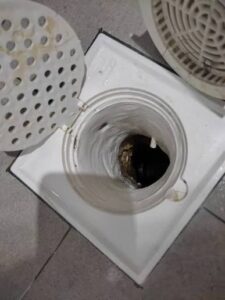
The nahani trap—the floor drain or drain-trap assembly in the bathroom—is another important area to inspect.
The junction between the drain assembly, surrounding screed, tilework and waterproofing layer is particularly vulnerable. If the seal around the drain cracks, separates or was not installed correctly, water can escape around its sides and travel beneath the tiles.
Repeated exposure to water, movement, poor installation and ageing materials can contribute to deterioration at this junction.
Common signs of nahani trap leakage
-
The ceiling below becomes damp after bathing or washing the floor.
-
Water appears around the floor drain or nearby tile joints.
-
Grout near the drain repeatedly cracks or becomes loose.
-
The surrounding tiles remain damp even after the floor appears dry.
-
Leakage continues despite cleaning or replacing the visible grout.
Water entering around the drain can travel beneath the tiled surface before becoming visible. This is one reason a ceiling stain may appear some distance away from the actual entry point.
How to prevent leakage around the nahani trap
-
Inspect the grout and seal around the drain regularly.
-
Check for cracks, loose tiles or gaps between the drain and surrounding floor.
-
Ensure the drain assembly and waterproofing layer are correctly connected.
-
Repair deteriorated joints using materials compatible with the drain, tiles and waterproofing system.
-
If leakage persists, arrange a professional inspection of the drain connection and underlying waterproofing.
Simply applying grout around the top of the drain may not solve a cracked or disconnected waterproofing detail underneath. Depending on the defect, the drain area may need to be opened and repaired properly.
3. Wall–Floor Junction Leakage: A Joint That Needs Regular Inspection
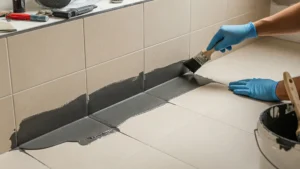
The junction where the bathroom wall meets the floor is another common location for water seepage.
This area experiences repeated wetting, temperature changes and small movements between building materials. Over time, the visible joint may open, the grout may crack or the sealant may separate.
These defects can develop within a year or two in some bathrooms, although the timing depends on construction quality, materials, movement and water exposure.
Why does the wall–floor joint open?
-
Minor movement between the wall and floor.
-
Shrinkage or deterioration of the joint material.
-
Inadequate preparation before grouting.
-
Repeated wetting and drying.
-
Poor detailing where the waterproofing layer turns from the floor onto the wall.
How often should you inspect this joint?
As a practical maintenance measure, inspect the wall–floor junction every six months, especially in bathrooms that are used frequently or experience regular water exposure.
Look for missing grout, fine cracks, gaps, loose material or a seal that has pulled away from either surface. Also inspect the junction after noticing new dampness or leakage.
If a defect appears, repair it promptly using a material suitable for that particular joint.
Should you use epoxy grout, cement grout or sealant?
The correct material depends on the joint’s function:
-
Epoxy grout: May be suitable for tile joints that need a durable, low-absorption grout.
-
Cement grout: May be used for suitable tile joints, but it is rigid and more porous than epoxy grout.
-
Flexible sealant: Often more appropriate for movement-prone changes of plane, such as wall–floor junctions, when specified for the tile and wet-area system.
Do not automatically refill every wall–floor junction with rigid grout. If the joint moves, rigid material may crack again. Follow the waterproofing and tile-system manufacturer’s recommendations.
Our practical recommendation: Make six-monthly bathroom joint inspections part of routine home maintenance. Repairing visible defects early can help reduce water penetration, but it cannot guarantee leak prevention if the underlying waterproofing or plumbing has failed.
4. Can Water Seep Beneath Tiles Without Immediate Leakage?
Yes. Water can enter through defective grout, drain junctions or other openings and accumulate in the bedding or screed beneath the tiles.
The moisture may take time to travel through the building materials before it becomes visible on the ceiling below. Consequently, leakage may continue for some time even after the bathroom floor looks dry.
However, not every damp ceiling below a bathroom is caused by tile-joint seepage. A leaking water-supply pipe, waste pipe, sanitary fitting or failed waterproofing system can produce similar symptoms.
The actual source should be investigated before choosing a repair.
5. Other Causes of Bathroom Leakage
Failed waterproofing beneath the tiles
A damaged, incomplete or poorly connected waterproofing layer can allow water to penetrate the underlying structure.
Concealed plumbing leakage
Supply pipes, waste pipes and connections may leak even when the tile surface and grout appear intact.
Faulty drain connections
The drain body, pipe connection or waterproofing detail around the drain may be defective.
Toilet or sanitary fitting leakage
A faulty toilet outlet, flush connection or other fitting may allow water to escape beneath the floor.
Cracks or construction defects
Cracks in the slab, gaps around pipe penetrations and poorly detailed joints can provide paths for water movement.
6. How to Identify the Actual Source of Leakage
Before removing tiles or repainting the ceiling, inspect the bathroom and determine where the water is most likely entering.
A professional investigation may include:
-
Visual inspection of grout, floor drains and wall–floor junctions.
-
Inspection of accessible plumbing and sanitary connections.
-
Moisture measurements in the ceiling and nearby walls.
-
Appropriate plumbing tests.
-
Thermal imaging to identify temperature patterns that may be associated with moisture.
-
Controlled water testing of individual areas, where suitable.
Thermal imaging can help narrow down the area requiring investigation, particularly in finished bathrooms where unnecessary tile removal is undesirable. However, it does not independently guarantee the exact leak source and should be combined with other diagnostic methods.
A methodical investigation can help distinguish between a localised joint defect, a drain connection problem, a plumbing leak and a broader waterproofing failure.
7. Can Bathroom Leakage Be Fixed Without Breaking Tiles?
Sometimes. If the defect is limited to an accessible grout joint, a suitable sealant or an exposed plumbing connection, a targeted repair may be possible without extensive demolition.
However, if the waterproofing beneath the tiles has failed or the drain’s waterproofing connection is cracked underneath the finished floor, surface-level repairs may not be sufficient.
Repeatedly adding grout over the same defect without investigating why it keeps returning can waste money and delay the necessary repair.
The objective should be to identify the source, correct the defect and test the repair before restoring damaged finishes.
8. Bathroom Leakage Repair Cost in Pune (2026)
Costs depend on the source of leakage, the extent of damage and the amount of dismantling and restoration required. The following figures are illustrative budgeting ranges, not verified live October 2026 quotations.
| Type of repair | Indicative budget |
|---|---|
| Localised grout or sealant repair | ₹500–₹3,000 |
| Minor accessible plumbing repair | ₹1,000–₹5,000 |
| Localised drain-trap repair | ₹2,000–₹8,000+ |
| Tile removal and local reinstatement | ₹5,000–₹30,000+ |
| Extensive bathroom waterproofing replacement | Depends on area and scope |
These figures are not fixed rates, and the categories can overlap. Tile type, plumbing access, labour, material selection and the extent of concealed damage can change the final quotation.
Ask the contractor to separate inspection, plumbing repairs, waterproofing, tile reinstatement and ceiling restoration costs.
9. Step-by-Step Approach to Prevent Bathroom Leakage
-
Inspect every six months. Check tile grout, the nahani trap perimeter and wall–floor junctions for cracks or gaps.
-
Repair defects early. Do not wait until water appears on the ceiling below.
-
Use suitable materials. Choose grout or flexible sealant according to the type of joint and manufacturer’s instructions.
-
Investigate recurring defects. If the same joint keeps opening, check for movement, poor detailing or an underlying waterproofing problem.
-
Check the drain assembly. Ensure the drain connection and waterproofing detail remain sound.
-
Test repairs appropriately. Where necessary, use a suitable test to verify the repair before restoring finishes.
-
Address persistent seepage professionally. If leakage continues after visible joint repairs, investigate the plumbing and waterproofing layer beneath the tiles.
Regular inspection and timely maintenance can help identify small defects before they develop into more extensive damage.
10. How Design Within Can Help
At Design Within, bathroom renovation planning involves coordinating waterproofing, plumbing, tile installation and finishing work in the correct sequence.
For homeowners in Pune, attention to the nahani trap, grout joints and wall–floor junctions is an important part of planning a durable bathroom. These details should be checked during construction and considered during periodic maintenance.
Whether you are renovating a bathroom or dealing with leakage in an existing one, identifying the likely source before starting repairs can help reduce unnecessary demolition and repeat work.
Planning a bathroom renovation or dealing with dampness? Visit Design Within to explore interior-design and renovation support.
At Design Within, we believe a beautiful interior should not only look good when it is completed — it should also perform well for years.
Before we dive into more details about designing your furniture, it might be helpful to estimate how much your interior design project could cost. Understanding your budget can help you make more informed decisions about what features to prioritize. To get a better idea, you can use our ‘interior design budget calculator’ budget calculator and start planning your dream home today.
Frequently Asked Questions
1. Can loose bathroom grout cause leakage into the ceiling below?
Loose or cracked grout can allow water to enter beneath the tiles. Whether it causes a ceiling leak depends on the condition of the waterproofing layer, the substrate and the route water takes through the structure.
2. Why does water leak around the nahani trap?
The junction between the drain and the surrounding floor may develop cracks, gaps or failed seals. A defect in the drain connection or underlying waterproofing can allow water to seep beneath the tiles.
3. How often should bathroom grout and wall–floor joints be inspected?
A practical starting point is every six months, with additional checks if you notice loose grout, cracks, standing water or dampness. Repair defects promptly rather than waiting for a leak to appear below.
4. Should I use epoxy grout or cement grout for bathroom joints?
Epoxy grout may be appropriate for many tile joints because it absorbs less water than conventional cement grout. Cement grout can also be suitable in certain applications. For movement-prone wall–floor junctions, a compatible flexible sealant or specified joint detail may be more appropriate than rigid grout.
5. Will regrouting stop bathroom leakage permanently?
It may resolve leakage associated with defective grout joints in some cases, but it will not fix failed waterproofing, a cracked drain connection or leaking plumbing. Recurring leakage requires further investigation.
6. Can bathroom leakage be detected without removing tiles?
Sometimes. Visual inspection, plumbing tests, moisture measurements and thermal imaging can help narrow down the source. However, some defects beneath tiles require localised removal to confirm and repair them.
7. Why does the ceiling below remain damp even after repairing the grout?
Moisture may remain in the screed, slab or plaster after the source is corrected. Alternatively, the repair may not have addressed the actual source of leakage. Allow appropriate drying time and seek further investigation if the dampness persists or worsens.
Final Thoughts
Bathroom leakage often begins at vulnerable details that are easy to overlook: deteriorating grout, the nahani trap perimeter and the wall–floor junction. Regular inspection can help identify these defects before they develop into larger problems.
For Pune homeowners, checking these areas every six months and repairing defects promptly is a sensible preventive maintenance practice. Use the correct material for each joint, and remember that grout and sealant maintenance complements—but does not replace—a properly installed waterproofing system.
If leakage continues despite localised repairs, investigate the underlying drain connection, plumbing and waterproofing rather than repeatedly treating only the visible surface.